Total Pageviews

Sunday, February 15, 2015

PIE PLATES AND TEA BOWLS

 My latest endeavors have me making pie plates.  The first ones were used as a blank "sheet of paper" on which to draw with the Amaco Underglaze pencil.  Now while the weather is too cold for sitting outside to draw, I've turned to my favorite pastime: mandalas.  Some people don't enjoy the geometry and symmetry and tight control in designs like this, but I enjoy the process of seeing a design unfold through mere repetition of an element.  I enjoy looking at and "listening" for what to add next.  It is always fascinating to see what pops out with the addition of a new color in a shape that had previously been obscure. 


My pie plates are inconsistent in size, the last one above even ended up a serving platter because I didn't use enough clay to pull up the sides high enough.   Four pounds is going to be my standard from now on.  Four pounds seems like a lot of clay to devote to one project but I'll have to just buy more clay so I feel like I can spare it!  (:  Below you'll see a plate on which I drew weeds using the Amaco Underglaze pencil, a drawing of an Iris from last spring, a faux gingham using colored slip, and a landscape using colored slips then when bisque fired drawing into with the underglaze pencil for details.

Weeds drawn onto bisque ware while sitting in the field using Amaco Underglaze pencil. 


 White Iris from my garden.
 Faux gingham made with colored slip.


Colored slips on soft leather hard, bisqued, then drawn on with Amaco Underglaze pencil. 


The tea bowls below were made in an effort to learn how to throw off the hump.  They were inspired by an ad in a little magazine that came in the mail.   I like the combination of Coyote Clays' Gun Metal Green glaze with my concoction I call "Sunday Potter Cinnamon". 


 I like the way the Gun Metal Green runs and combines with my Sunday Potter Cinnamon. They are perfect for yogurt or a bit of ice cream. 
 
 
That's all for now, folks, back to the potter's wheel if I can find time between cleaning the attic and cleaning the kitchen cupboards!
 
ttfn  


Saturday, October 11, 2014

JACK FROST IS ON HIS WAY AND SO AM I

With the threat of a frost coming to take out all my flowers and vegetables, there is the promise that with them will go the invasive weeds and creeping grasses.   With that comes my new freedom for a fall filled with fun!   I have one more seven pound ball of Laguna BMix waiting to be formed into something new, then a trip to Charleston, WV to the Capitol Clay Arts Company to pick up my new supply and maybe some new tools and glazes.

My latest is this 25" tall pot built with the help of a friend who showed me what to do, let me use his clay and his extruder to make the coils to make the pot that Ellen made. 
So, if all goes according to plan, I should have more fun in pottery this fall and I'll share my explorations with you.   Thanks for visiting. 

This'll be all for now.

Thursday, April 24, 2014

SIX PIERCED TRACERY BOWLS

     Challenging myself to make six matching bowls with pierced tracery.   I love to pierce and have made several bowls with pierced designs along their rims but never feel comfortable using them because I feel like the food is going to slip out the piercing.   

Duh.   A rim is what I need, to separate the food from the openings in the design. 
 
So I made six [matching?] bowls:


They match better than I've ever done before, don't look too closely.   I used the yellow Mud Tools rib to form the inside curve, a trick which I've never done before.   
 
After getting them trimmed and pierced I set them to dry:


Because the rims were much thinner than the base and body I had to wrap the rims to keep them from drying faster.


Finally I could unwrap them and clean up the piercings.   What was I thinking!?  Eight shapes per bowl, six bowls, 48 little paisleys!   eeegads.


These will look pretty much like this when finished because I plan to glaze them with white.
 
THE END
 
Thanks for visiting,  ttfn
Finished, they are glazed with Coyote Clays white and a touch of Sedona Sunset on the rims.
 

Friday, March 14, 2014

7 POUNDS, 12 INCHES!

Inspired by Hsin-Chuen Lin on You Tube I have begun to challenge myself to work with more clay and make larger things.  His work is elegant and smooth and his working style is the same.

He works slowly and deliberately with no apparent missteps.  

Today, thanks to his "guidance"  I pulled this 12 inch cylinder from a seven pound piece of clay.  I actually did not have the strength to knead seven pounds of clay so I centered a three and a half pound piece then put another three and a half pound piece on top of that.   Then I pulled it up to 11 inches and went home for lunch.


After resting a bit and eating some lunch I went back out to the studio and managed to get yet another inch out of it.  With more courage I could have gotten at last another inch but I didn't want to lose it so I stopped. 


Again following Hsin-Luen's lead, I made the cylinder into a "square".  


Here is an insert of this pot as glazed.   I used shellac to paint the designs onto bone dry clay, then sponged off the surrounding clay to lower it.  After bisque firing I used Amaco under glazes to color the design and covered them with clear glaze and fired to cone 6. 


Now on to bigger and better things.


Also on You Tube I found a way to use shellac as a resist medium.   Here are a cup and a bowl using this technique,  and beyond them is one on which I used sodium silicate to create texture. 


 Below is a pot on which I  practiced chattering.


High speed internet is a wonderful thing!!!   You Tube is an amazing teaching tool!  

Thanks for visiting.  This'll be all for now.

Thursday, February 13, 2014

SPONGE HOLDERS! and high speed internet!

I have discovered a new gadget to make:   sponge holders!

My kids have one at their sink and I fell in love with it.  I usually used dish cloths but hated the process of finding a discreet place to hang them to dry--yuck.  

The little sponge holder is just the thing!   I've been exploring how to make them more "aireous" (my word for airy) by cutting designs in the sides.  The ones pictured below have yet to be cleaned up but here they are:

 
I don't usually go to craft shows but it seems like it would be fun to have these on hand with sponges to give as "gifts" to friends who come to visit or whom I visit. 
 
As an aside, I am excited because we just installed Hughes Net and now, if this post goes well, I'll feel more like adding to this blog!  
 
ttfn Thanks for visiting. 


Sunday, November 10, 2013

MY FIRST FIVE POUND POT


 Centering is the primary goal of a potter when working on the wheel.  In all my years of college ceramics I had to wait until becoming a teacher of beginning ceramics to find the best advice on centering.   It came from a video made by renowned potter Robin Hopper in his “Beginning to Throw”.  Contrary to all my previous learning, he advises to “catch” the clay with the LEFT hand, not push it with the right.   While catching the radius and ulna bones in the lower arm must be aimed  directly at the center of the wheel.   That is the key: aim directly at the center as if your arm is a hand on an analog clock.   Then the right hand is placed so that the outside edge of the palm (whole pinky side) is on top of the clay curving and pushing the clay into a hemisphere like an orange or grapefruit.    It is difficult to describe the process of centering in words, so if you’re truly interested I suggest you search for his video or watch videos on Ceramics Arts Daily*

Soooo, below you see the first five pound piece of clay I have ever attempted to center.   It took quite a while and I followed the advice to center the top half first then cone the clay upward and get into the middle and bottom sections.   

 
 I finally got it all centered and pulled up this cylinder.   I had to stop to take a picture of course, with camera in plastic bag to protect it from my clay full hands.
Glad I am that I took this picture because as you can see in the next picture, the next pulls were not so successful.    I must have gotten it too thin in the middle because there certainly is a wobble in it!   Time to bring out the trusty new Mudtool and make it earn it’s price!


 I managed to straighten it out and pull up a neck, somewhat, but there are still some little dimples in the surface as you can see in the photo below.  

Undaunted, I carried on and finally made myself stop with this form.  To hide the little dimples I covered those spots with sprigs of leaves:


Finally I bisque fired it then glazed it with Pistachio Shino glaze.   Again you will see how dramatically the feel of the pot changes when it turns dark in the firing.
   I took this pot to a craft show and it was purchased  for $35! 
                                                                                                                                                                                              

* Ceramics Arts Daily is a website that offers free video clips each day many of which are of throwing techniques.
Thanks for visiting!  ttfn


Sunday, November 3, 2013

"ROPE POT"


ROPE POT

I had just finished making a perfectly round pot which looked like a ball.  I loved the process and the result, so for this pot I started with the idea of making another “Ball Pot” by making and putting together two hemispheres: 

 
Unfortunately, the top section much larger than the bottom section so I had to camouflage the discrepancy in their sizes.  I used a big fat coil on the rim of the bottom section, scored and dampened with magic water, then set the top section over it.  I pushed the coil up to the top section and mushed (sorry, that’s a technical term you might not understand) everything together well, but the coil still protruded. Below is a picture of this process in process.        “It looks…HIDEOUS!”  


Actually I was somewhat “inspired” by the contemporary modern work seen in the ceramics magazines, none of which I find inspiring.  I am put off by the spontaneity of much of the work which to me indicates little thought and much happenstance.   It’s as if the artists are taking a page from Jackson Pollock and letting the universe control or determine the forms they present.   I taught art at the high school/middle school level and very much enjoyed the students’ sudden appreciation of an event such as the colors of paint swirling on the surface of water, or the forms created in clay when it drops on the floor or they just throw it onto the table.  Oftentimes these forms are worthy of examination but rarely are they worthy of being kept as a finished piece of artwork.  While a piece of clay that looks like a draped fabric is exciting in that the clay takes on the textures of the surface onto which it has been pressed, it seems to me that it should then be manipulated and controlled by the hand of a thoughtful and considerate artist to create a pleasing form rather that left to lie where it landed and be bisque fired.   But since I always admire those who have made the grade to be published, whether or not I agree with their viewpoint, I decided to work in that vein and be more spontaneous.   I rarely let my media be in control, but on the few occasions I have I have been pleasantly surprised.   Ever a former student in mind.
 
  I decided to use the bulge as a design element and wrapped a stick with string to make a paddle.   As I beat the join with the paddle it created a texture that did camouflage the discrepancy in the sizes between the two hemispheres, but it looked quite odd.  I made another long coil and cut it in half lengthwise and applied it to the body of the pot by scoring and using the Magic Water, then beat the coils onto the surface of the pot to create the same texture.   
I had just read an article in October 2013 Ceramics Monthly about pots made by Matt Repsher.  He treats the surface of his pots by scratching with a hacksaw then paints with slip then scrapes with a fettling knife to leave slip only in the scratch marks.   His work was fascinating to me with its textures and because of its pierced tracery.   I was anxious to try this technique so I did it in the low spaces between the coils. 
 
 
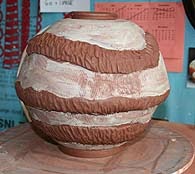
Above the pot is painted with slip from Laguna’s BMix clay.  My friends and I all laughed, thinking it looks like an Oreo Cookie or some kind of gooey pastry! Below is a photo of it after I scraped off most of the slip with a fettling knife.          


Since the coils look like ropes after the beating with the paddle I call it my “Rope Pot”.   When it is fired it will be a dark brown and I think I will leave it unglazed on the outside.   In photo below you will see how this clay changes from the terra cotta color to almost black after a glaze firing.
Here is the final product: 

 
Now, back to the drawing board.
Thanks for visiting!   ttfn